Tuesday, January 8, 2013

Valentines Decor!

Last weekend my best friend Mel and I were on a mommy shopping day.  Our mission?  Find decor for our mantles for Valentines Day!  But, at the end of the day- we went home empty handed.  I told Mel- either I am getting too picky, or there just isn't good stuff out there that isn't cheesy.  My solution?  Make the decor myself of course!  Today I am going to show you how I made a cute wire decor for my mantle.


 Here is what you will need:
-Wire
-Wire Cutters
-A marker or something round like a dowel
-Hot Glue
-Scrapbook Paper or paint
-Modge Podge
-A piece of Wood (I like to use crown molding)

Now, I started this project with a specific quote in mind.  I wanted to use the Beatles lyric, "All you need is love, love is all you need."  I just wasn't sure HOW I was going to get it up there.  I went into  Michaels with the thought of buying wooden letters and painting them.  But- HOLY CANOLI at a $1.50-$1.99 per letter, that was WAY too expensive for 5 weeks of decor.  Then I stumbled upon some Christmas wire that was 80% off!  Now, I have never done ANYTHING with wire before, but I figured I would give it a shot!
I went home and got to work.  I was cutting and bending wire like a mad woman!  Here is what I ended up with-
OK- now to the fun part.  Here is how I bent the wire (the example below is of me making a heart for the center)

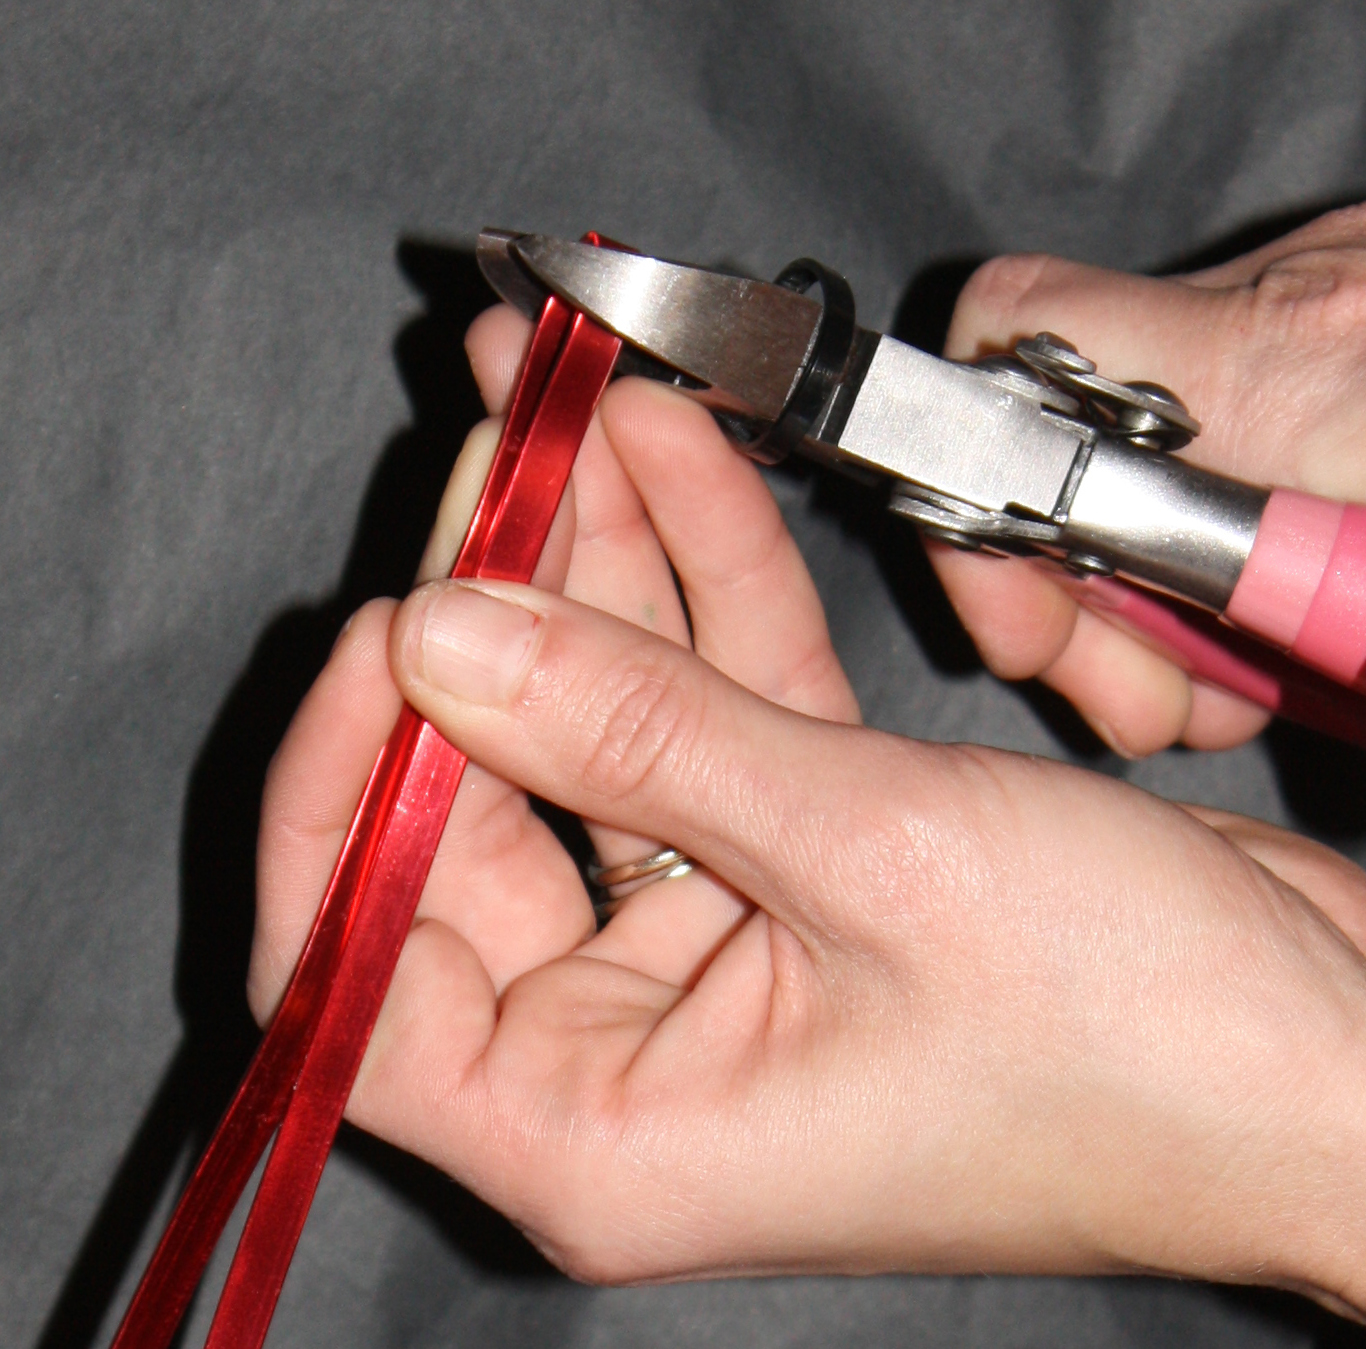
Start by cutting a piece of wire to work with- 

Next, to make the bottom of the heart, I folded the wire in half, and gently crimped it with my wire cutters (be careful not to push too hard or you will cut it!) to create a nice bend.

The comes the fun part!  Start bending the wire how ever you want to form your shape (or letter)

To curl the ends, simply wrap the wire around a marker, or a wooden dowel.


And before you know it- your shape is done! 


Now you have all of these fun shapes and letters that you can use to decorate however you want.  Glue them to wreaths, hang them from ribbon- you name it!  I decided I wanted mine to stand on the mantle, so my next project was to glue them to wood.  I wanted something different from a solid color- so I modge podged my wood to make it different.  Here's how you do it:


Cover your wood with modge podge while your paper soaks in some warm water (the warm water softens the paper enough to make it easy to work with!) 


Next, lay your scrapbook paper on the wood, and gently fold it into creases, and over the edges.  When you are done, add another coat of modge podge.


Now you have to be patient and let it dry!  The hardest part for me :)When your wood dries, you are ready to add your letters!  This part is easy peasy, just hot glue the bottoms, and put them where you want them-


Now, here is the part that is NOT so easy- the decorating part (DUN DUN DUN!!!) Now, this is the thing that makes me different than your average blogger.  I'm not perfect- and I am not an interior designer!  So, as you are decorating any space- just remember it is ok to mess up- do something and then change it, or make multiple trips to the craft store :)  Just remember- if you get frustrated, walk away for the rest of the day.  When you look at it the next day with fresh eyes, you will have a new perspective. 

So, I started this project wanting to use black flowers- I looooove black.  No clue why, but I thought black flowers with some red and white mixed in would be really cool!

But, dang it!  It just didn't look right- my letters were hard to see.  So back to the store I went, to buy white flowers.  I started by pushing them right up against the letters- 

Then I realized Chad would be upset that I was blocking the remote receiver, so I scooted them back a bit, and voila!

Here's the full mantle- (I promise the words show up better in real life- HA!)

So now you are all set to make some awesome wire decor.  Go crazy and make letters for your kiddos room, your kitchen, your living room, or whatever!  And tag me in your pics when you are done!

XO
Cass

Tuesday, November 6, 2012

My story

 So, I have been working on my about me section in my shop today, and I figured I would share it with you guys to.  It was a little painful to write, and to think about where I was ten years ago, but I think it is good to tell my story, because it may inspire others- what do you think?

I'm Cassi, and I have made over 8,000 garments out of my bathtub.  No kidding!  I want to tell you my story in hopes that it inspires you to follow your dreams.

I never knew what I wanted to be when I "grew up".  To be honest, I felt like my options were pretty limited.  The expense of college was not something my parents could undertake, so I graduated high school at 17 (a year early), and moved to the ghetto of OKC (the only place I could afford to live on my own), and worked at Kmart.  A few years later, Kmart closed, so I went to work for Walmart.  Even then, I knew that I did not want to be there forever- there had to be something better for me out there, and my life was not meant to be spent slaving away for a large corporation for crap pay.  It was like an endless cycle though- when you can barely afford to eat, how can you pull yourself out?

I have always had a creative soul- in fact, during those hard times, being creative and artistic was about the only thing I could do to find a break from the hard times around me.   I spent a lot of time painting- I would paint just about anything I could get my hands on.  The other thing that got me through those rough times was volunteering, and giving to others in anyway I could.  It made me feel like even if times were hard for me, I could still make a difference.

I got married young, and even though that was NOT a smart idea, I got the best gift I could ever ask for from that relationship- my son, Wes.  When I found out that I was pregnant, I started dabbling in tie dye- it was a fun way for me to make something really neat out of things that I already had around the house.  I didn't have anyone to teach me, so my creative personality kicked in, and I spent hours testing and trying new things- never in my life could I have imagined that I was giving myself an education for what would eventually become my career.

In 2007 I found myself a single mom of a one year old son.  As fate would have it, I ended up falling in love with a hot shot manager from Arkansas.  We had met when I was pregnant with Wes, and became fast friends.  He was my age, a bad boy, and NOT the kind of guy you would ever consider settling down with.  In a strange turn of events, we seemed to make each other better people just by being friends.  When we started dating, we were the oddest couple- no one who knew either of us would have ever put us together- we were complete opposites.

Chad saw the artist in me, and encouraged me to follow it.  "Why not?" he would tell me.  So, I went back to my tie dye adventures- spending every extra penny I had on supplies.  I begged anyone and everyone to look at my work, and to buy stuff from me.  I started trying new techniques that I thought MIGHT work- and refined, and practiced.

My sister had told me about this website called Etsy- as she described it- it was the most amazing thing ever- all handmade, and perfect for people like me.  Chad suggested that I try it- just to see what would happen.  I specifically remember saying, "No one who doesn't know me is going to buy my stuff."   When I got my first Etsy sale, I literally thought I had broke my computer, or something was wrong- where did this money come from?  When I realized that I had actually sold something- to a stranger, no less- I took the money I had made and invested it right back into my creations.  Thanks to word of mouth, my shop was getting steady sales, and with each new order, I got  better- I was determined to refine my technique, teach myself how to do new things, and to make my clothing something that people would love.  I wanted to break the barriers that tie dye held- I wanted to make clothes that were gorgeous, and unique. 

The hard work paid off- before I knew it, my shop was keeping me busy full time, and I was living the life that I was determined to get!  In turn, this gave me more time to fulfill my other passion- giving.  Life was good- people recognized me when we went places- specifically Walt Disney World.  We would get stopped, and people would ask me to sign their autograph books, and take pictures- it was an amazing feeling.

Now, you think this is my happy ending- but it is not.  You see, I made a stupid mistake when I opened up my first shop.  I was selling TONS of Mickey Mouse tie dye- everyone loved them.. well, everyone except for Disney.  I woke up one morning and found that my shop, and everything I had worked so hard for, had been shut down for copyright infringement.  This fueled my creative fire- instead of giving up- I started over and reinvented my line.  I thought my dream was over, but I refused to quit.  After a few VERY scary weeks, my new line caught on like wild fire, and that leaves us where I am today :)

If you have a dream- FOLLOW IT.  If you want to change your life- CHANGE IT.  It won't be easy, and it feels scary, but you will never know until you try!  You might just find your ONE  GREAT THING :)

To check out my current "good works" projects- check out http://www.cassiselby.com , or find me on facebook at http://www.facebook.com/onegreatthing

XO
Cass

Wednesday, October 17, 2012

Yummy Mummy Drinks

The following conversation REALLY happened between my 6 year old son and I a few weeks ago....

Wes:  Mom, can we have a Halloween party? 
Me:  That might be a good idea, we can think about that.
Wes: Good- because I told my whole class yesterday that we are having a Halloween party!

So!  We are having a Halloween party for Wes and all of his little friends.  Now, if you know me, you know I can't just have a simple Halloween party, I have to have (what my husband lovingly calls) a Halloween party on steroids! 

I thought it would be fun to share some of my crafty projects for those of you that are planning Halloween get togethers as well.  I always make sure my projects are kid friendly, because crafting is more fun when you do it with another person, and my little helper is always Wes!

Today I am going to show you how to spruce up some boring juice boxes and turn them into fun mummys!


Here is what you will need:
-1 roll of white Duck Tape
-Sticky eyes (I bought mine from Oriental Trading )
*Note- you could use googly eyes to, but to me, hot glue and a 6 year old is an accident waiting to happen.
-Juice Boxes (I get Juicy Juice, because they have Box Tops, and the school collects them)


Step one.. remove all of the straws from the juice boxes (you'll want to use them to drink with later after all!)
Next, you will want to get your Duck Tape ready... You will want to leave some pieces big for the bottom, and tear some of the others in half to make wrapping easier for little hands...
Wrap the bottom part of the box with a regular (untorn) strip of Duck Tape- it makes wrapping the rest easier.

 Then continue wrapping the box in any random way you want until it is covered.. just remember to leave an opening to put the straw in later!


Last but not least, add some silly sticky eyes to finish off your mummy!
That's it!  How fun and easy is this project?  Now go get crafty!
XO Cass 


Friday, October 5, 2012

Livin' in a LEGO house!

First I have to give a shout out to my friend Renee- who inspired my blog title :)


Today I am going to show you how to make some amazing shelves to hold all of those little Lego guys that you love to step on :) 
The hardest part of this project was tracking down shelving to use.  I lucked out and found some two tiered photo ledge shelves on sale at Kohls, however, it looks like they are sold out on the website right now.  Here is a link to some on  Amazon though :) If you are lucky enough to have an Ikea near you- this option is much cheaper!

Alright- so if you are living in a Lego house, you probably have enough Lego's at home already to create your shelves.  Just go through and pick out a bunch of the square bricks.  If you want to do the shelves all in one color, just go to the Lego store and take advantage of the pick a brick!

Next, you are going to dot Gorilla Glue across the section where you want the bricks to go (remember- Gorilla glue expands, so little dots, not big blobs!)
Next, you are going to add your bricks.  I liked working on small sections at a time, so I didn't have to worry about my glue drying out-
And just keep going until you fill your ledges!  This was sooo easy, that my six year old son could help :)
That was easy, right?  Now just let them dry for 24 hours, and let your little one go crazy putting up the Legos (just don't tell them it's really cleaning!)
Have a great weekend everyone!
XO
Cass


Wednesday, August 15, 2012

THE BIG BOY ROOM MAKEOVER

The last time I redecorated Wesley's room was when he was young enough that I could pick the theme- Toy Story, of course.  It was kind of a mish mosh of all things Disney though- perfect for my little Disney crazy toddler.

It all started with something simple enough- I got the new Pottery Barn Kids catalog.  I was showing Wes the backpacks (since we had to order one for school), and low and behold, he sees... the Star Wars bedding collection.  "I WANT that!" he exclaimed- "My room is a baby room- I want a big boy room like that!"

He had a point- so I told him I would save up some money so we could do it around Christmas.  Little did he know, I had a scheme to surprise him with a room makeover.  I called Chaddy and he was on board!  So, while Wes was with his dad over the weekend, Chad and I went to work!

Here are the before pictures :) 


After two weeks of ordering some amazing stuff for his room online (and hiding it as it came in) it was all coming together!


I was really nervous about putting glass over Wesley's bed, so I mounted his Darth Vader poster (left) to the cardboard that came with his frame with spray adhesive.  I should also note that it was pretty much impossible to find a frame that would fit the poster, so I bought a smaller size and trimmed it down.  Then I framed a Star Wars Typography made specifically to match his new room decor.  We topped off the look of the print by using a set of curtain hooks to mount a lightsaber above it.  We also added and extra shelf above his bed to hold his extra Mickey hats!


The bedding was one of the most expensive investments in our project, but I love how it pulls the room together! 

 Of course, every little Jedi needs a cool place to hide stuff (lunch box from Hobby Lobby), and a big kid alarm clock.  That little guy is really cool- you push his head down to turn him off!  Now, that little Death Star looking thing on the right is the Star Theater Pro by Uncle Milton.  It actually projects rotating stars and planets into Wesley's ceiling at night time, and let me tell you - it is amazing and well worth the money!  I was worried when I ordered it, because the reviews on the different varieties of these things look scary on Amazon- but I took a chance and went the best model- and I am so glad I did! 


We painted Wesley's natural wood colored Lego table black to make it cohesive with the rest of the room.  I don't know what it is with me and black furniture, but it is my favorite way to make something old look new and modern!  I had made those awesome little Lego guy shelves a few weeks before (don't worry- I'll tell you how to do it this weekend!), and it really brought the little space together.   Then of course, I had to create something new for his table... so here is what happens when I play Legos (no kit required kids!)


Speaking of Legos- Chad had an amazing idea to hang Lego Star Wars ships and planets from the ceiling with fishing string.  So, after an impromptu trip to The Lego Store, Chad was happily building Legos in the dining room.  Just a little tip for those of you guys that have kids that pull apart the creations you spend hours building- SUPER GLUE.  My husband is a genius!  It makes the bigger sets more durable for rough play!

Next up is this awesome custom Jedi Knight vinyl I found on Etsy.  I had it made in silver, and put it on his headboard- it really pops!  I also have to say- being somewhat of a vinyl addict, this was a GREAT high quality vinyl and design.  It went on smooth, and has not budged (it you have ever made the mistake of buying one of these from Hobby Lobby- you know how important stickability is!) The best part is- the shop had awesome prices, and shipped this to me super fast!

Last but not least- the dresser area....
We completely recovered his dresser with Star Wars paper- don't worry- I'll blog about how to make one soon! 

We topped that area off with a R2D2 print by The Daily Robot on Etsy.  This print knocked my socks off!  It shows the hypothetical inner workings of R2- but if you ask me, they look pretty accurate!  The seller was also super friendly about getting me the print in time for my project, and his shop is full of other amazing work as well!

If you are wondering- Wesley's reaction the the surprise was like nothing we had ever seen before!  We love surprises around here- and the last time we surprised him with a trip to Disney, his response was, "Ok, let's go." but THIS brought on screaming, jumping, hugging, "I can't believe it's!" and, "I LOVE YOU I LOVE YOU I LOVE YOU!"  Now THAT makes it all worth it!

XOXO
Cass